Wednesday, August 31, 2011

Colorbok Rose and Doily Card

This is my first 6 X 6 card and I really enjoyed doing it. Lets start with pictures of the card and the video I made to show you all how I did it.

I started punching out 5 doilies from Stamp-in Up Triple Layer Punch
I cut a Colorbok Cream 6 X 12 base and scored in the center to make a 6 X 6 card base.
The base layer was cut at 6 X 6 inches and the top layer was cut at 5.5 X 5.5 inches from the Colorbok Rosewood Paper.
I used my xacto knife to trim around the semi circle to open it up and allow room for the doily punches, to make a lacy border. I inked around the doily punches and all of the layers with Colorbox Chestnut Ink. I layered everything as even as I could and the final touch was to add the sentiment. The sentiment came from My Creative Time (smile, everything will be fine)
Thanks for visiting me today and happy crafting.
God Bless
Sherry


Tuesday, August 30, 2011

Create A Critter Cat Cards

Hi everyone. I love the Create A Critter Cricut Cartridge and believe that most of you do as well. Here are a couple cat cards that I made before I started blogging and I hope that you like them as much as I do.


I hope that you like these and they encourage you to pull out your Create A Critter Cartridge.
Thanks for visiting me today and happy crafting.
God Bless
Sherry


Monday, August 29, 2011

Butterfly Card for Simply Sunday "Winged Things" Challenge at Getting Cricky w/ K Andrew

I've been watching Kristal's blog for a while now and I love how she just sits down with her camera and whips out a card while she talks to us. So I thought (that was the first thing I did wrong) if Kristal can fly by the seat of her pants, so can I. So I pulled out my trusty flip camera and was ready to make my card. Well, needless to say, two hours later I was still sitting here with an unfinished card and a dead battery. LOL I've come to the conclusion that flying by the seat of my pants is definitely not gonna work for me. I was so upset I was about to throw the whole thing in the trash and my husband walks up and says, I don't like the butterfly border. Cut them apart and your card will look nice. So I cut my butterflies apart and 2 minutes later, my card was done. You know how some people just have a natural gift for making things look beautiful and then there is me. I guess God has blessed us all with different talents and I'm thankful for the ones that I do have.
Here is the link if you'd like to play along with us.
 http://www.gettingcricky.com/2011/08/simply-sunday-winged-things.html
Well, I guess I should show you my card.


10 X 7 scored at the 5 inch mark to make a 5 X 7 Card.
The green and white polka dot layer is cut at 4.75 X 6.75.
The pink butterfly paper was cut at 3 13/16 X 6.50.
They both came from the Girly Girl Colorbok Paper Pack from Wal-Mart
I used the EK Success (American Girl) Butterfly Punch from Hobby Lobby across the top of the green polka dot paper. Then embossed the pink butterfly paper with my (Crafts Too) Butterfly Embossing Folder from Custom Crops.
I cut the butterflies from my Cricut Sampler Cartridge at 1.5 inches.
My computer generated sentiment was cut out with a 1 3/8 circle punch and then backed with a bright pink 1 3/4 scalloped circle punch from Stamp-in Up. I just ordered my first set of Kristal's stamps and can hardly wait to start using them. Go to her blog and check them out.
Thanks for visiting me today and happy crafting.
God Bless
Sherry

Sunday, August 28, 2011

Bloom Where You"re Planted 5 X 7 card

Papertrey Ink - Melon Berry Ribbon and Aqua Mist Card Stock
Wal-Mart - Colorbok - Spring Morning Paper Pack
Stamp-in Up - Eyelet Punch

Card Base - 5 X 7
Second Layer - 4.75 X 6.75
Top Layer - 4.25 X 6.25
Computer Generated Sentiment - 2 X 6.75
after border punch 1.5 X 6.75

Papertrey Ink Melon Berry Ribbon across top 2 layers and sentiment layer.
Added the ribbon knot on the left hand side. I cut the sentiment layer so that it is a little further to the right to give extra space for the bow.
Thanks for visiting me today and happy crafting.
God Bless
Sherry


Saturday, August 27, 2011

Create a Critter Cow Card

Hey all, this is another card I made before I started my blog. I used create a critter cricut cartridge and got the ribbon from walmart. I inked around the edges of the cow with chestnut roan ink. I ran the top half of the paper through my big shot and embossed it. I know it's a very plain simple card, but I absolutely fell in love with it and it's one of those cards that you make and have a hard time parting with. The sentiment is from Stamp-in Up and I thought it said exactly what I wanted my card to give to the person who receives it. A SMILE.
Thanks for visiting me today and happy crafting.
God Bless
Sherry

Friday, August 26, 2011

Shaped Card Breast Cancer

I try to keep all of my colors and things that I used written down in a journal so that when I post it. I can refer back to it. Well, apparently I have managed to loose the recipe to this card and I will give you what information that I can recall.
This was cut from the superman cartridge and it was cut at 7.99 X 3.50. Thank God for my gypsy. It was as large as I could make it to fit in a business size envelope. I'm sure I used white from Papertrey Ink but can't remember what color I used for the pink. I took my irock and used my swarovski crystals for some bling.  We had to make 10 for our swap, so I had to make them something I liked, yet wouldn't be difficult to recreate several of. I hope my fellow design team members like these. The Pink Stamper has a project on her website about sending cards to cancer patients. So if you get this in the swap and it's not anything that you can use, you might want to pass it on through that program.
Thanks for visiting me today and happy crafting.
God Bless
Sherry

Thursday, August 25, 2011

Queen of my Craftroom California Themed Project

A California Themed Project - huh - I had to put a lot of thought into this one. I grew up in West Virginia, so that's my favorite state. I've lived in Florida now for almost 20 years and I really couldn't think of anything that I did in California that I couldn't do here in Florida. So for a while I was really stumped. Then it came to me. There was one thing in California that I couldn't have gotten anywhere else. One of the most precious gifts I've ever been given came from California.

It was ----- MY HUSBAND.
He was stationed in San Diego, the cutest sailor I ever saw and that is where we lived for the first year of our married lives. We met on Christmas day and I'd have married him that moment if he'd have asked. We were together a total of 21 days before we got married and I couldn't ask for a better husband for myself or father for our children. So this is my California Themed Projected, the cutest sailor from The Base at Point Loma.

This is a picture of us on our wedding day. I bought a mini canvas and easel set from Wal-Mart. Then decoupaged it and waited 15 minutes between coats. Each time making sure that I switched directions from vertical to horizontal.
Thanks for visiting me today and happy crafting.
God Bless
Sherry


A Small Haul Video

I hope that you enjoyed my video and excused my little blooper at the end. Sometimes my tongue just refuses to do what my brain tells it to.
Thanks for visiting me today and happy crafting.
God Bless
Sherry

Wednesday, August 24, 2011

Mission to Mars Vacation Bible School

We had a great day for our last day of Vacation Bible School. Our theme this year was a Mission to Mars and this was our day to launch the rockets. One of our crafts this year was to make an actual rocket that we could launch with my husband's air compressor. The kids were still going strong, but I had to get out of the heat. They all had a great great time. They filled up on hot dogs and chips first and then proceeded on to mission control.


Thanks for visiting me today and catching up on the non-blogging world of Sherry Wolfe.
Happy Crafting.
God Bless
Sherry

Monday, August 22, 2011

Queen of my Craftroom - Tag Swap

On the Queen of my Craftroom design team we do a swap each month and last month's swap was to do a tag. I've never really done tags before but a lady that I follow faithfully on youtube Duffer9904 made some tags with the clear plastic that they cricut cartridge's come in and I thought they were so cool that I decided to give them a try.
Here is the recipe I used to make this tag.
Custom Crops - Cuttlebug Embossing Folder - Daisy
Pink By Design - Our Kids Set - a big hub
Stamp-in Up - Circle and Scalloped Circle Punch
Staples - Neon Yellow and Lime Green Card Stock
I put the circle on the front with a glue dot and the the scalloped circle on the back so that you could write a to and from on it for a gift bag.
Thanks for visiting me today and happy crafting.
God Bless
Sherry


Saturday, August 20, 2011

Hoping Your Day is Filled with Smiles.

This is just another of the simple cards that I made before I started blogging and I wanted to share it with you. I hope you all like it.
The dog is from the Doodlecharms cricut cartridge and he was cut at 4.5 inches. He was made for a little boy who's dad was in Iraq and the background paper was as close to camouflage as I could get. I did a little chalking, inking and doodling to give him a little something. He is also on an action wobble.  I hope he brings a smile to your face.
Thanks for visiting me today and happy crafting.
God Bless
Sherry


Friday, August 19, 2011

A2 Sympathy Card

Hi everyone, we had a fun little challenge at Queen of my Craftroom and it was to use black, white and just a small bit of pink. I don't think I've ever made a black and white card. But pink is my favorite color so I was gonna take this challenge and see what I could put together. As much as I wish things weren't this way, I've needed several sympathy cards and decided to use this as an opportunity to make one. My daughter always says that I make my sympathy cards in colors that are to bright. Well, this is definitely not the case today. I'll show you my card and then I'll give you the recipe. Let me know if you think this card is to bluhhhh to give out to someone in mourning. The last thing I want to do is make that situation worse.

This is an A2 size card and I dove tailed the end of the ribbons. Here is a list of the supplies I used.
Papertrey Ink - Black and White Card Stock and White ribbon
Wal-Mart - Colorbok - Neutral Stack
Joann's - K and Company  - Elegance Swirls
Stamp-in Up - X lrg Decorative Label Punch, Four Frames Stamps and Regal Rose Ink
Sentiment - computer generated.
Thanks for visiting me today and happy crafting.
Let me know what you think.
God Bless
Sherry

Thursday, August 18, 2011

Hello Fellow Crafters

We had to go to a funeral the other day and I've been very sick since we got back. But I wanted to post a few of the cards that I made before I entered blog land and started keeping track of all the things that I used. If there is something that you are particularly interested in, leave a comment and I'll try to get you an answer.


Thanks for visiting me today and happy crafting.
God Bless
Sherry


Tuesday, August 16, 2011

Altered Project for Queen of my Craftroom

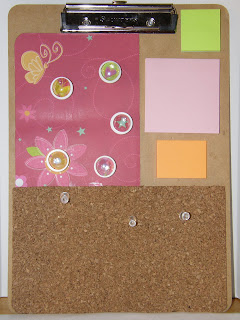
This is a super easy project that I have made to go inside the lockers of some of the kids that go to our church. It's an instant message board for all of their school needs.
I started out with a clipboard. I went to my local hardware store and got a piece of 5 X 7 flashing and used my atg tape to cover it with American Girl Paper. Then again from the hardware store, I got carpet tape. It's real strong and wide double sided flat tape. I started by using my corner chomper and rounding the one corner of the metal flashing and then put the tape on the back and butted it up against the clip on the board and pressed it down good and tight. Then I had picked up some cork from Wal-Mart and used a box cutter (because that blade was longer than my xacto knife) and cut it down to
8.5 X 5. Again I used my corner chomper and rounded the two bottom corners. Using the carpet tape that I put on the back I laid the cork over the top of the metal and across the clip board. I added 3 different sizes of post a notes that they can use for part of their school work. I purchased some accent marbles, which I call half marbles that they carry in the floral department. I used my 3/4 inch hole punch and punched the holes from the same paper I covered the metal with to make my magnets. I put some glue on the paper and pressed it to the bottom of the marble. Then I added a larger round button to kinda give it a more finished look and then placed a round magnet on the back. I've found that using those flat magnets that come in a strip are not heavy enough to work for this project. I will also be adding those same magnets to the back to have it stick to the school lockers. I added a few push pins into the cork and voila, I was done. I wasn't sure who I was giving this one to, or I would have printed out their initial and made the magnets monogrammed. I've done that for Christmas presents and they look so awesome with monograms under them - because whatever you put under the half marble is magnified. It's really neat. Well, I hope you like what you've seen and come back often.
Thanks for visiting me today and happy crafting.
God Bless
Sherry


Saturday, August 13, 2011

Candy Holders for I Feel the Love with Madison from Funky Cards and upcoming Super Sunday Challenge at Getting Cricky with K Andrew

This project is going to Madison at Funky Cards - Feel the Love Project . The recipient this month is a very sweet little girl named Kate. I'd love it if you'd check this project out and join in with what I hope to be a bunch of us crafters, and show this family how much they are loved, prayed for and thought of.
I used Tags, Bags, Boxes and More Cricut Cartridge and cut the tag holder at 8.5 inches. I was able to fit 3 to a 12 X 12 sheet plus the liner (because my paper was single sided). I used my computer and printed the names for the 3 children in the Feel the Love Project. Once I printed them out I punched them out with the 1 3/8 inch circle punch from Stamp-in Up. Then I punched two 1 3/4 scalloped punches in different colors to layer behind the name circle. I scored all the lines and then added the liner. Once the liner was in place I put atg tape on the two sides and sealed the tag holder. I added the name punch with 2 dimensionals. Then used my cropadile to punch the hole in the top of the tag holder and in the second scalloped circle. I used twine from Pink By Design that matched my color scheme and put it through the scalloped circle, knotted that and then ran it through the larger hole on the tag holder. (I made the twine long enough so that the holder could go around a gift bag or door knob for a little early morning note for someone special in your life. Then I used my white gel pen and made accents on the scalloped circles. For the final and best step, I slide a pack of fun size m&m's inside the holder.

Thanks for visiting me today and happy crafting.
God Bless
Sherry

Thursday, August 11, 2011

Making Your Card Making and Gypsy Using Easier.

I'd like to say I'm sorry, this is not the best video that I've done. I have a brain tumor and had a lot of pressure around my brain. So I really had a hard time coming up with the words that I wanted to use. So my speech is a little slower than normal. I figured I'd better tell you all what was going on, I didn't want anyone to think I was intoxicated or worse. Thanks for understanding, I appreciate it.
Thanks for visiting me today and happy crafting!
God Bless
Sherry

Wednesday, August 10, 2011

Thank you Thuy!

A few post ago, I told you about my daughters sweet friend. She worked all day doing nails and then she came to our house that evening and for a special treat to me and my daughters, she did all of our nails. I had never had anyone do my toe nails before - at first it felt a little awkward. But Thuy put me at ease real quick and she painted my toes to match the awesome job she did on my fingers. Mariah couldn't decide on a color, so after she narrowed it down to 10 colors. Thuy used 5 to paint her finger and toe nails and she took the other 5 and used them to paint flowers on top of the base polish. This young lady must have the patience of Job. Mariah messed them up 4 times and Thuy just would clean that one off and start all over.
Now to show you why I told you all about my nail polish experience again.
I wanted to be sure to say thank you for all her kindness. So this is the card that I made her. I probably should have made the polish bottle larger, but I think it turned out okay. The recipe will tell you everything that I used.
Papertrey Ink - Hibiscus Burst and Razzberry Fizz Card Stock, Razzberry Fizz Ribbon
Stamp-in Up - Melon Mambo
Target - Colorbok - Metallic Paper Pack
Custom Crops - Imaginisce - Garden Party Stack
Joy's Life - Mother and Daughter Stamp Set - Thank You
Pink By Design - Pink Twine
Slumber Party Cricut Lite Cartridge
I cut the nail polish at 3.5 inches and all it's layers and the heart was cut at 1.54 inches and all it's layers. Using Stamp-in Ups Melon Mambo ink, I inked around all the pink pieces.
I put some pink twine through the hole I punched in the heart and wrapped it around the polish bottle. I put dimensionals on the back of the bottle and placed it onto the card but I wanted the tag to look like it was just kinda hanging around. So I placed adhesive under the heart and then adhered it to the card. I hope you like my little "Thank You" card and I really hope that Thuy liked it too.
Thanks for visiting me today and happy crafting.
God Bless
Sherry

Monday, August 8, 2011

Back to School - Hair Barrettes

I wanted to let you know the winners of the back to school blog hop are
Tiffany from sparkledmemories.blogspot.com
and
Ashley from especiallymade.blogspot.com.
Please contact me with your address and I'll get your prize mailed out to you as soon as possible.

Back to School - Hair Barrettes
I have 2 beautiful daughters and my oldest is a sophomore in college and she has been wearing beautiful barrettes and bands in her hair. My littlest is in middle school and she's a bit picky about what she'll wear. She's just now starting to put clips in her hair. I got her the cutest little pixie haircut the other day, because I got tired of fighting the fight every morning to get all the tangles out. Well, needless to say she looks more adorable than ever before. Her favorite is the pink feathery one with the big pink bling in the center. I'm so glad that is her favorite because I think it's adorable and I'd like to make her one in every color. With her her cut as short as it is, this definitely makes her unmistakeably a girl.
The barrettes with the flowers and the pink feathers are super easy to do. I picked some small flowers, because I thought that Mariah would like them better and I simply hot glued them to the hair clips, that I bought from Wal-Mart. The ones with the different loops of ribbon are a little more complicated to figure out. Still simple once you know how and I will do a video of them later on. I'm not feeling well and have a sick child, so my time is kinda limited right now.  You'll be surprised how easy they are to make.

This hair band is the one my oldest daughter wears. I took a ring of feathers and then found two broaches that I thought would match. One was a cameo of a dolphin over the ocean and this one had the lighthouse. Danée picked this one. She thought the dolphin cameo would be to heavy. So that is something to take into consideration, if you want to do one like this.
Below is my beautiful model, Mariah. She picked out the two that she wanted to try on for you. Of course, I think the model is way prettier than the hair barrettes and that is my totally unbiased opinion. LOL


Thanks for visiting me today and happy crafting.
God Bless
Sherry

Sunday, August 7, 2011

Back to School Blog Hop Day 2 - It's the Most Wonderful Time of the Year.

Hi Everyone! I hope that you are enjoying this hop as much as I am.
For today's project I made an A7 card (5 X 7).
I love my children with all my heart, but I have to admit, the closer we get to the first day of school the bigger my smile gets. LOL  I'll be the parent singing, (It's the most wonderful time of the year.) and dancing down the street as the bus drives away. (Only Kidding)
If you just happened upon my blog, you'll want to start at the beginning. I wouldn't want you to miss out on any of the great inspiration these ladies have worked so hard to share with you.

Michelle: http://queenofmycraftroom.blogspot.com
Sherry Wolfe: http://www.upordowntheyrebeautiful.blogspot.com/ (You're here) 
Before I start telling you the products I used. I'd like to thank Anita Cannon, (a fellow design team member). I needed a bus for my card and not just any bus, but the back of the bus. So that you could tell that the bus had picked up the kids and was moving on. Well, they had exactly what I wanted on the Locker Talk Cricut Cartridge but I don't have that cartridge. So I asked if anyone had that cartridge and would be willing to cut it for me. Anita responded immediately and asked what size I wanted. Not only did she send me one bus, she sent 2. So I want to say "Thank You again Anita. I really appreciate what you did for me." I had this card all laid out in my head and having that bus was a crucial piece.

So now back to my card.
I also used the Everyday Paper Doll Cricut Cartridge (Mom and grass) and also the Create A Critter Cricut Cartridge (clouds). Mom was cut at 2.5 inches and all her layers, the grass was cut at .35 inches and the clouds were cut at 1.25, .75, and .50 inches.
I inked around the edges of the clouds. Used a Sakura Gelly Roll Pen for faux stitching and accents.  Peachy Keen Stamps PK-490 Everyday Character Face Stamps.
Stamp-In Up - Old Olive, Soft Suede, Blushing Bride and Bashful Blue Card Stock along with dimensionals.
Papertrey Ink - White and Blueberry Swirl Card Stock
Joann's - Bazzill - Blackberry Swirl
The Paper Company (Value Pack) - Brights (Peach and Yellow)
Pop Dots and Glossy Accents
The road and the grass on the right hand side were cut free hand. My oldest daughter Danée had a lot of great ideas to help me with this card. She is so talented and artistic. I'm real proud of her.
Now for the blog candy for the final day of the hop. DCWV The High School Matstack
What you need to do to win this DCWV Matstack is to leave a comment and become a follower. No comments will be accepted after midnight EST and I apologize but I can only ship in the Continental United States. I will announce my winners on Tuesday, August 9th.
If you'd like to be entered for the sponsor drawing you need to leave a comment on all the blogs and Michelle at Queen of my Craftroom  will announce the winner for the sponsors blog prize on Tuesday, August 9th.
Thanks for visiting me today and Happy Crafting.
God Bless
Sherry

Saturday, August 6, 2011

Queen of My Craftroom - Back to School Blog Hop

This is my first blog hop and I am so excited to be participating. If you came across my blog and would like to start at the beginning go to Queen of My Craftroom.
For today we are making Back to School wrapped candy bars.
The paper was cut at 5.5 X 7.25 inches for a 1.55 ounce Hershey Chocolate Bar.
I used my printer and copy paper to make my own designer paper, ATG tape and a Fiskars Paper Crimper. Most card stock is to thick to use and just won't fold tight enough around your candy.
The video will tell you all the dimensions and other products that I used to make the second wrapped candy bar.


(the instuctions for the yellow wrapped bar and the supplies I used are on the video)
Michelle: http://queenofmycraftroom.blogspot.com
Carol~ http://cardstockscissorsandglue.blogspot.com
Susan - http://itsmesusanp.blogspot.com
Jenny - http://crazyaboutcricut.blogspot.com/
Jill ~ http://TheScrapoholic.blogspot.com
Lynne Kirsch ~ http://hercraftiness.blogspot.com
Tanya ~ http://little-scrapper.blogspot.com
Tina~ http://craftyandgreen.blogspot.com
Tammy ~ http://thepurplemuse.blogspot.com
Anita ~ http://www.anitaandbugs.blogspot.com
Lisa ~ http://handmadewithlove-lisa.blogspot.com
Corrine ~ http://celebratingordinarymoments.blogspot.com/
Robin ~ http://scrapandchat.blogspot.com
Stephanie ~ http://www.alwayscrafting.com
Donnalee ~http://ottersln.blogspot.com/
Jenn Lorist ~http://jennspapercrafts.blogspot.com
Berenice Rendon http://karbers.blogspot.com/
Sharon Littrell~http://simplysweetbysharon.blogspot.com/
Sherry Wolfe: http://www.upordowntheyrebeautiful.blogspot.com/ (you're here)
Kristen: http://fantabulouslypink.blogspot.com/ (next)
Mila http://milamemories.blogspot.com
Wendy http://cricutyourclassroom.com
Bobbi Jo - http://sweetsassydiva.com
Andrea http://andreascoffeetime.blogspot.com/
Kerri ~ http://www.caresofkerri.blogspot.com/
Kimberly~ http://hellocutiecrafts.blogspot.com
Jamie - http://jmecreations.blogspot.com
Misty ~ www.abusyplace.blogspot.com
What would a blog hop be without some blog candy. I will be giving away the DCWV - The Grade School Stack - 4.5 X 6 (with glitter and foil) today and DCWV - The High School Matstack tomorrow.
So be sure to check back. All you need to do to be entered to win the mat stack today is leave a comment below by midnight EST and become a follower. 
 I'm sorry but I can only ship in the continental United States. My winner for Saturdays drawing will be announced on Tuesday August 9th.
If you'd like to be entered for the sponsors grand prize drawing you need to leave a comment on all the blogs and Michelle at Queen of my Craftroom blog will announce the winner for the sponsors blog prize on Tuesday, August 9th.
Thanks for visiting me today and happy crafting.
God Bless
Sherry

Wednesday, August 3, 2011

Getting Cricky Card (Think Positive)

My project for the Getting Cricky Card Challenge (Think Positive)


Four Legged Friends Cricut Lite Cartridge
Dog and all layers cut at 4.5 inches
Papertrey Ink - Hawaiian Shores Card Stock
Joann's - Bazzill - Guava Sensation and Carob Cream Card Stock, Glossy Accents and Colorbox (Province and Pinwheel Inks) I-rock and bling
Wal-Mart - Earth Tone Card Stocks
Stamp-in Up - Very Vanilla Card Stock and Scalloped Edge Punch
Joys Life - Mother and Daughter Stamp Set - I believe in you.
Custom Crops - QuicKutz - Poker Picker Upper
RAK - Cotton Candy Stickles

A2 size card
1st. layer cut at 4 X 5.25 inches
top layer cut at 3.75 X 5.0 inches
scalloped layer 1 X 3.75 inches
Thanks for visiting me today and happy crafting.
God Bless
Sherry

Tuesday, August 2, 2011

RAK from Kerry Duff (Duffer9904)

Before you watch the video, I wanted to apologize for giving the wrong youtube channel for Kerry. You can find more of Kerry's great videos at Duffer9904.

Sometimes, actually every time, I record my videos, I get so nervous. So sometimes my brain says one thing and my mouth says something completely different. Kerry is a great lady and I've thoroughly enjoyed getting to know her and she even allowed me to send something to her kids. Spoiling other people's kids is like my favorite thing to do in the whole world. She sent me such an awesome RAK and I wanted to share it with you all.
A special "Thank You to my Lovely Assistant as well." LOL
Thanks for visiting me today and happy crafting.
God Bless
Sherry


Monday, August 1, 2011

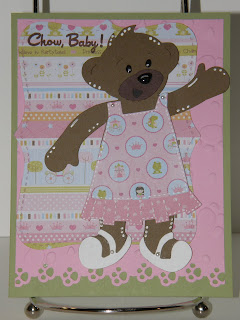
Chow Baby Bear

This is one of my favorite cards because I got to use a lot of my favorite things. Let me start by telling you all of the neat things that I got to play with.
Stamp-in Up - Chocolate Chip, Soft Suede and Pear Pizazz Card Stock. Build A Bear Die, Dress Up Die, Top Note Die, pearls and dimensionals. (some of my favorite things)
Custom Crops - Imaginisce - Enchanted Paper Pad
Joann's - EK Success Paw Print Punch, Glossy Accents, and
Bazzill - Guava Sensation and Blackberry Swirl
Ebay - Sizzix - Build A Bear Embossing Folder
Scrappy Mom Stamps - Furry Friends - Chow Baby

I hope you enjoy my card and enjoy Stamp-in Up products as much as I do. Like I said in an earlier video. I have no connection with Stamp-in Up, unless you count that my husband yells about all the money I spend with them. LOL
Thanks for visiting with me today and happy crafting.
God Bless
Sherry